Push notification for iOS
Overview
Incorporating Firebase into your iOS application streamlines your development process and arms your project with a comprehensive set of tools essential for modern app development. Firebase offers functionalities like real-time databases, user authentication, and analytics, enabling you to efficiently craft sophisticated mobile applications without the burden of managing server-side infrastructure. This guide delineates the essential steps to integrate Firebase into your iOS application, starting from creating a Firebase project to incorporating various Firebase SDKs.
By following this guide, you'll unlock Firebase's full potential, streamlining your development process while enhancing both the functionality and the user experience of your app.
Before we delve into the step-by-step setup, let's ensure you meet the prerequisites necessary to prepare for integrating Firebase into your iOS development workflow. This setup will empower you to leverage Firebase's extensive features and elevate your iOS development endeavors.
Prerequisites
Before you begin the integration process with ios, certain preconditions need to be fulfilled:
- Signed In from Google Account: You must be signed into a Google account. This is necessary because Firebase services are tied to Google Cloud, and a Google account is required to access the Firebase console.
- Firebase Project Created on console.firebase.google.com: You need to have an active Firebase project. If you haven’t created one yet, you'll need to set up a new project in the Firebase console. This serves as the container for your app and its associated services.
- Google Analytics Enabled: Ensure that Google Analytics is enabled for your Firebase project. This is crucial for tracking user interactions and behaviors within your app, which helps in making data-driven improvements.
- Configured Google Analytics: Along with enabling Google Analytics, it should be properly configured to meet the specific needs of your app, such as setting user data privacy options and connecting it with other Google services if necessary.
Steps by Step Guide to Setup Firebase for IOS
Once your project is created you can add Firebase to your app. Follow the steps below to add iOS app.
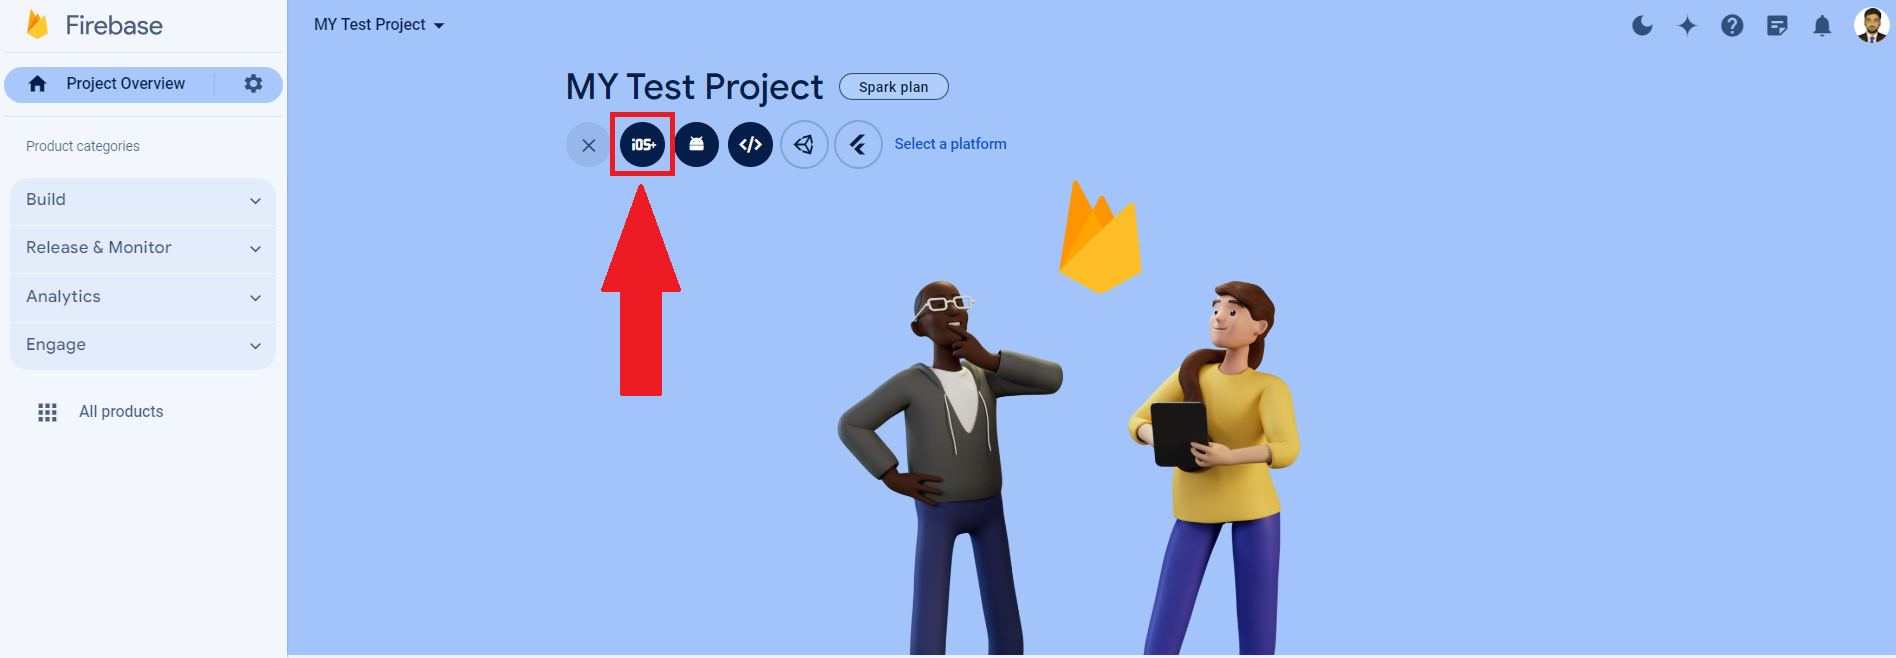
Step 1: Click on IOS Icon
Open your project and click the iOS icon.
For iOS, we need credential files generated in the iOS ecosystem and added in the firebase configuration for the iOS application.
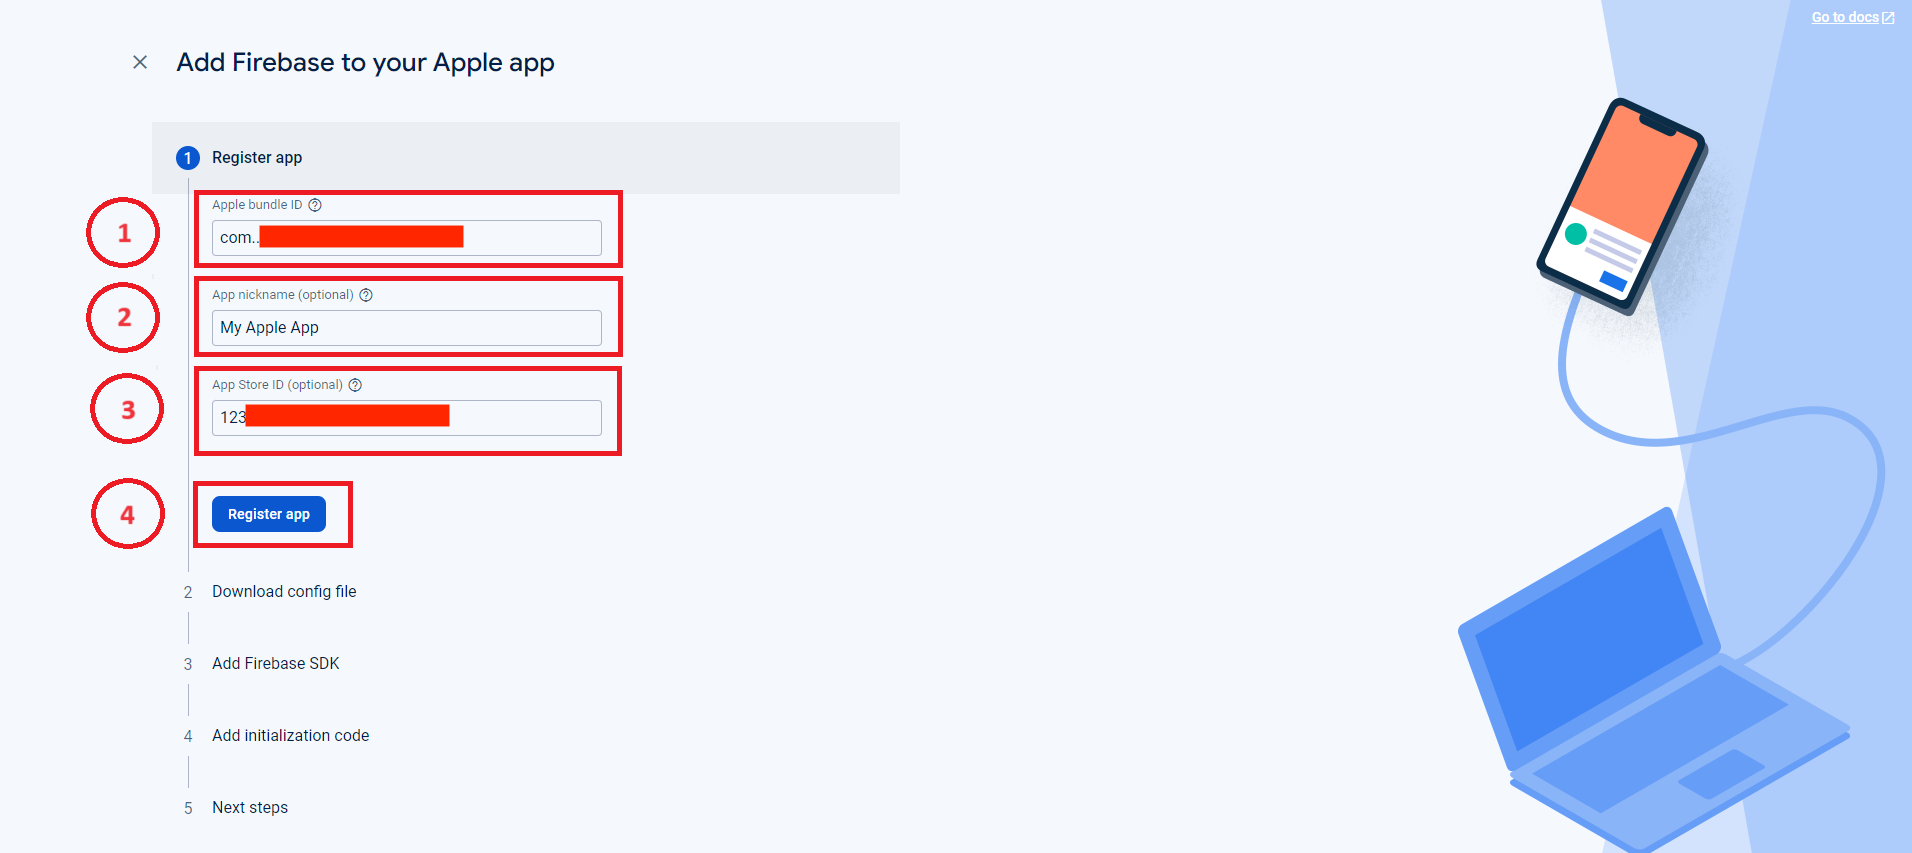
Step 2: Register APP
To register your app fill in the following fields:
i. Apple bundle ID (You can find your Bundle Identifier in the General tab for your app's primary target in Xcode). This field is required.
ii. App nickname (This will be used in the console to represent this application and is not visible to users). This field is optional.
iii. App Store ID (You can find your App Store ID in your app's URL. In the example below, 123456789 is the App Store ID. https://itunes.apple.com/us/app/yourapp/id123456789). This field is optional.
After adding all the relevant information click on Register App button
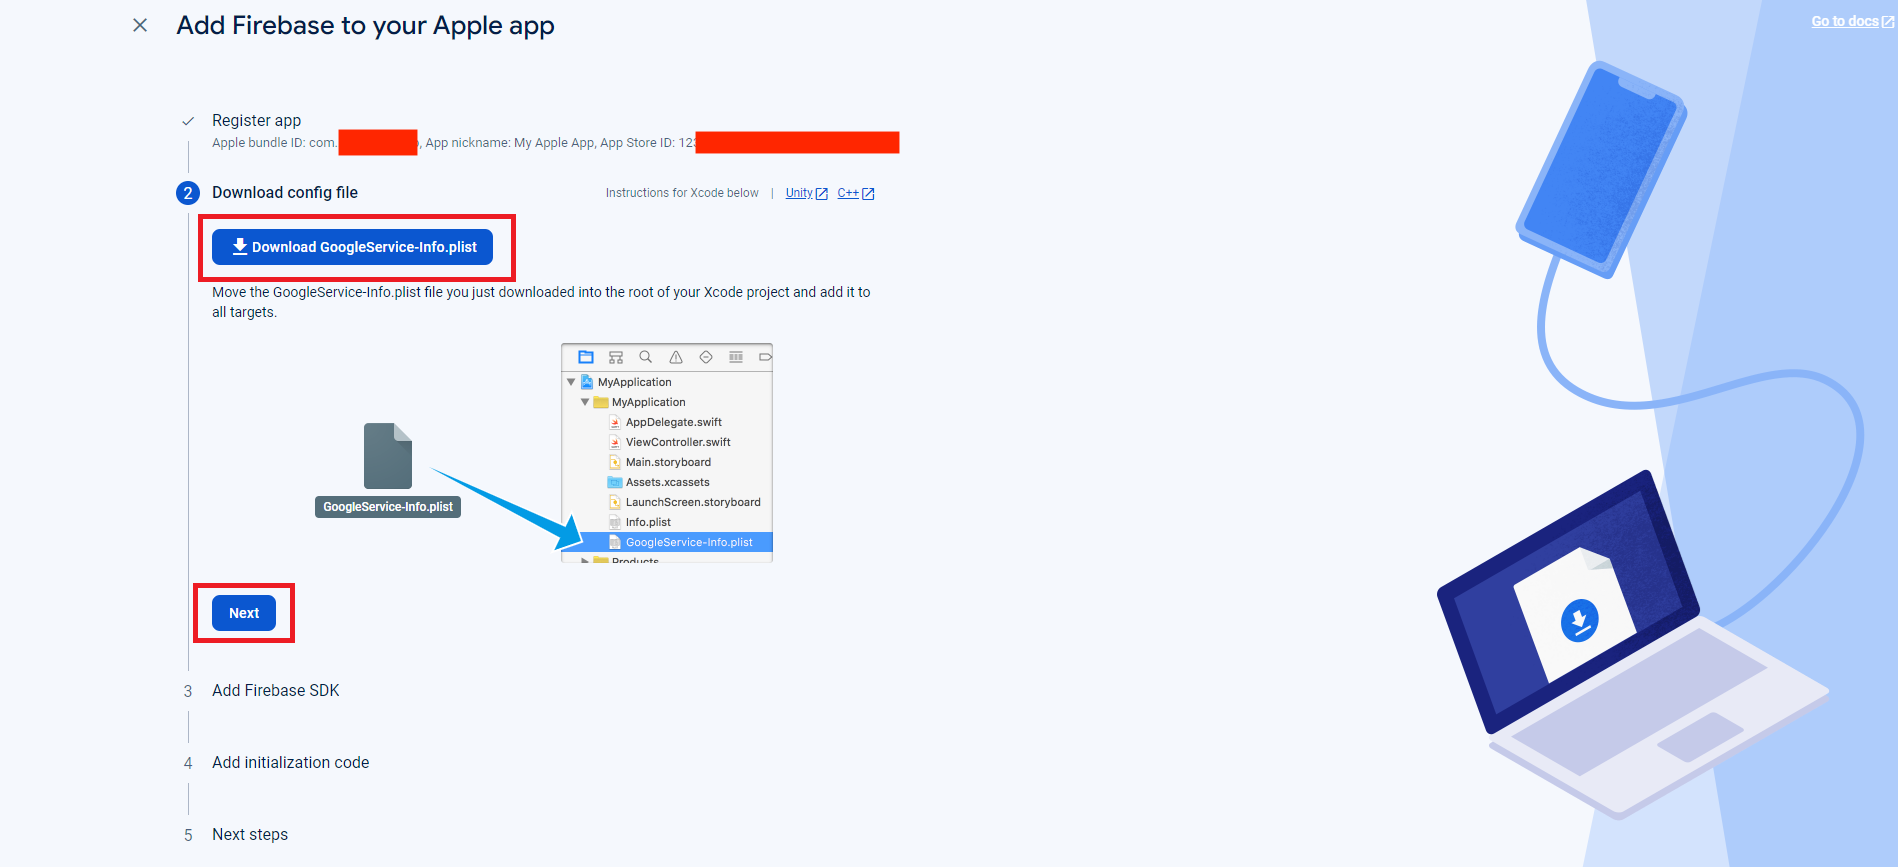
Step 3: Download Config File
At this step you can download config file. For this click the Download GoogleService-Info.plist button and then click the Next button.
Move the GoogleService-Info.plist file you just downloaded into the root of your Xcode project and add it to all targets.
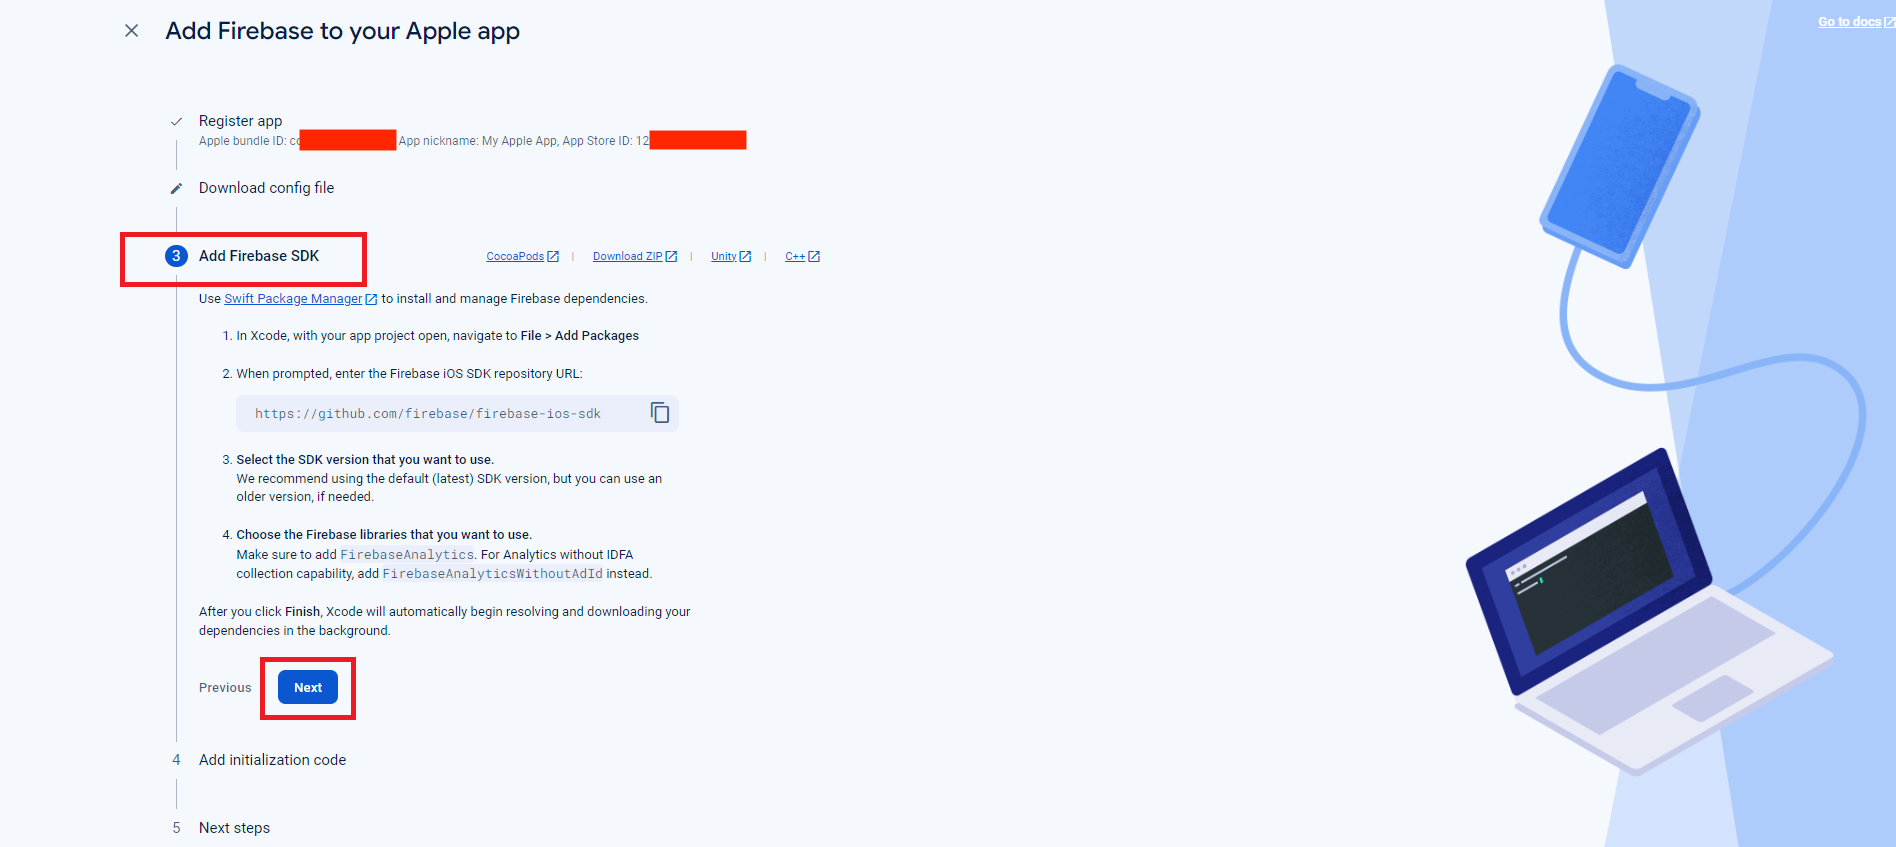
Step 4: Add Firebase SDK
Add Firebase SDK and click the Next button.
Use Swift Package Manager to install and manage Firebase dependencies.
-
In Xcode, with your app project open, navigate to File > Add Packages
-
When prompted, enter the Firebase iOS SDK repository URL
<https://github.com/firebase/firebase-ios-sdk> -
Select the SDK version that you want to use.
We recommend using the default (latest) SDK version, but you can use an older version, if needed. -
Choose the Firebase libraries that you want to use.
Make sure to add FirebaseAnalytics. For Analytics without IDFA collection capability, add FirebaseAnalyticsWithoutAdId instead.
After you click Finish, Xcode will automatically begin resolving and downloading your dependencies in the background.
Step 5: Add initialization code
To connect Firebase when your app starts up, add the initialization code below to your app's main entry point.
Add initialization code to connect Firebase when your app starts up and click on next button
import SwiftUI
import FirebaseCore
class AppDelegate: NSObject, UIApplicationDelegate {
func application(_ application: UIApplication,
didFinishLaunchingWithOptions launchOptions: [UIApplication.LaunchOptionsKey : Any]? = nil) -> Bool {
FirebaseApp.configure()
return true
}
}
@main
struct YourApp: App {
// register app delegate for Firebase setup
@UIApplicationDelegateAdaptor(AppDelegate.self) var delegate
var body: some Scene {
WindowGroup {
NavigationView {
ContentView()
}
}
}
}
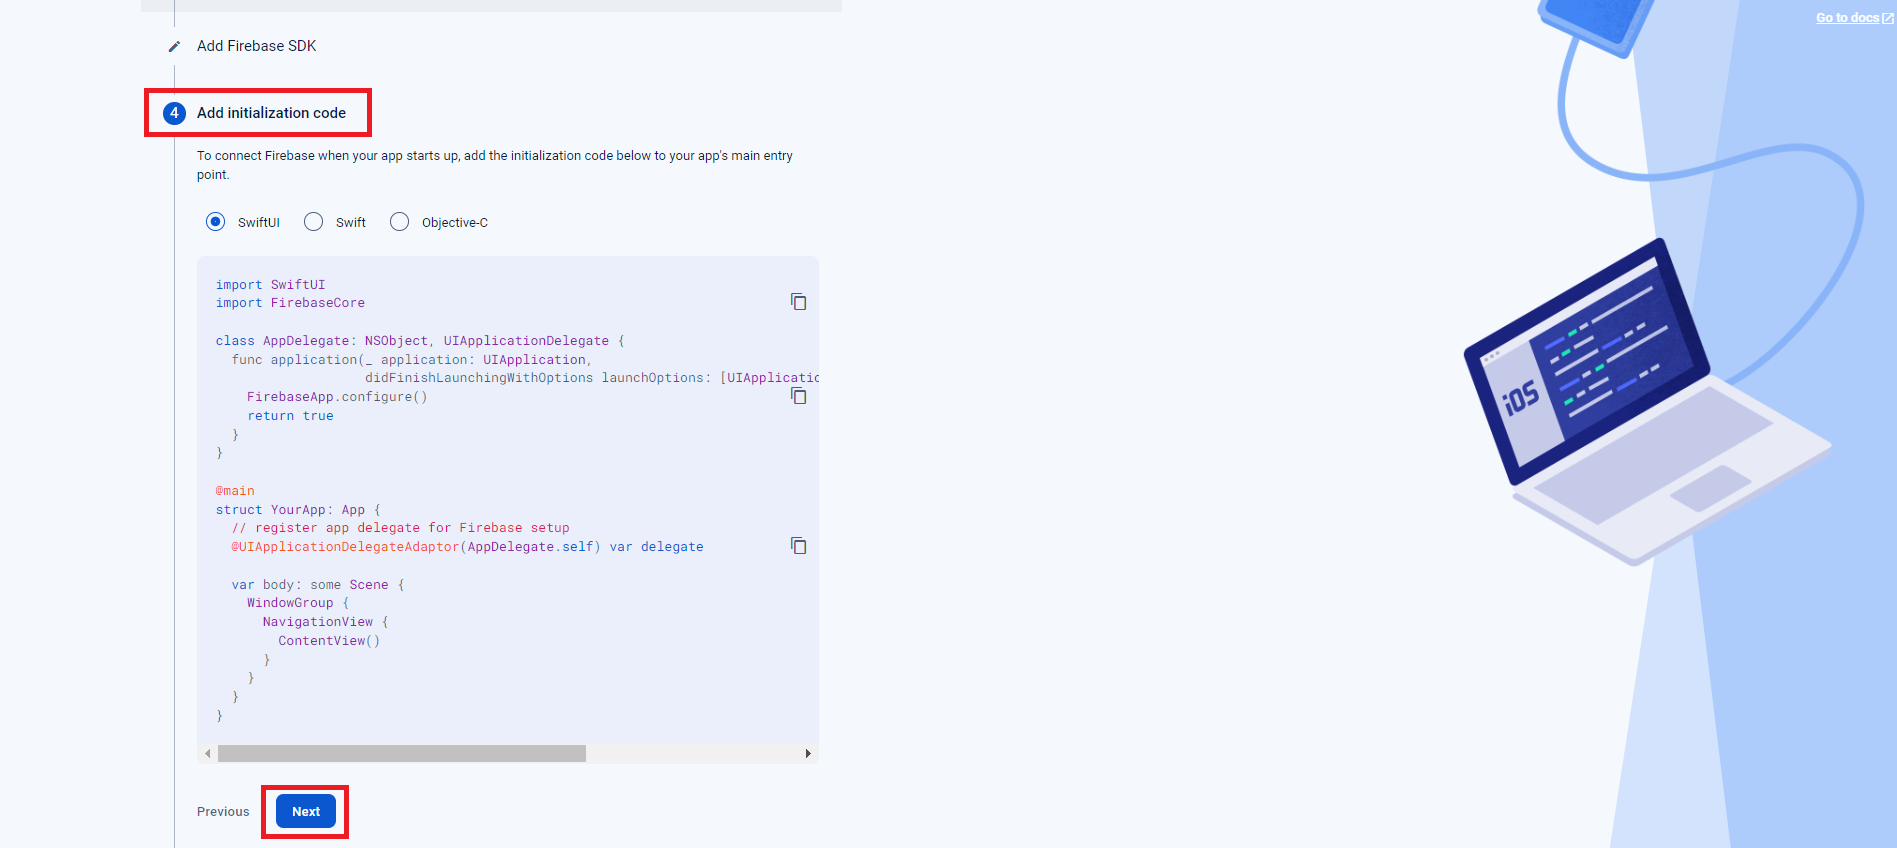
From this step you will get:
- Instructions to install and manage Firebase dependencies;
- Firebase initialization code snippet for AppDelegate class.
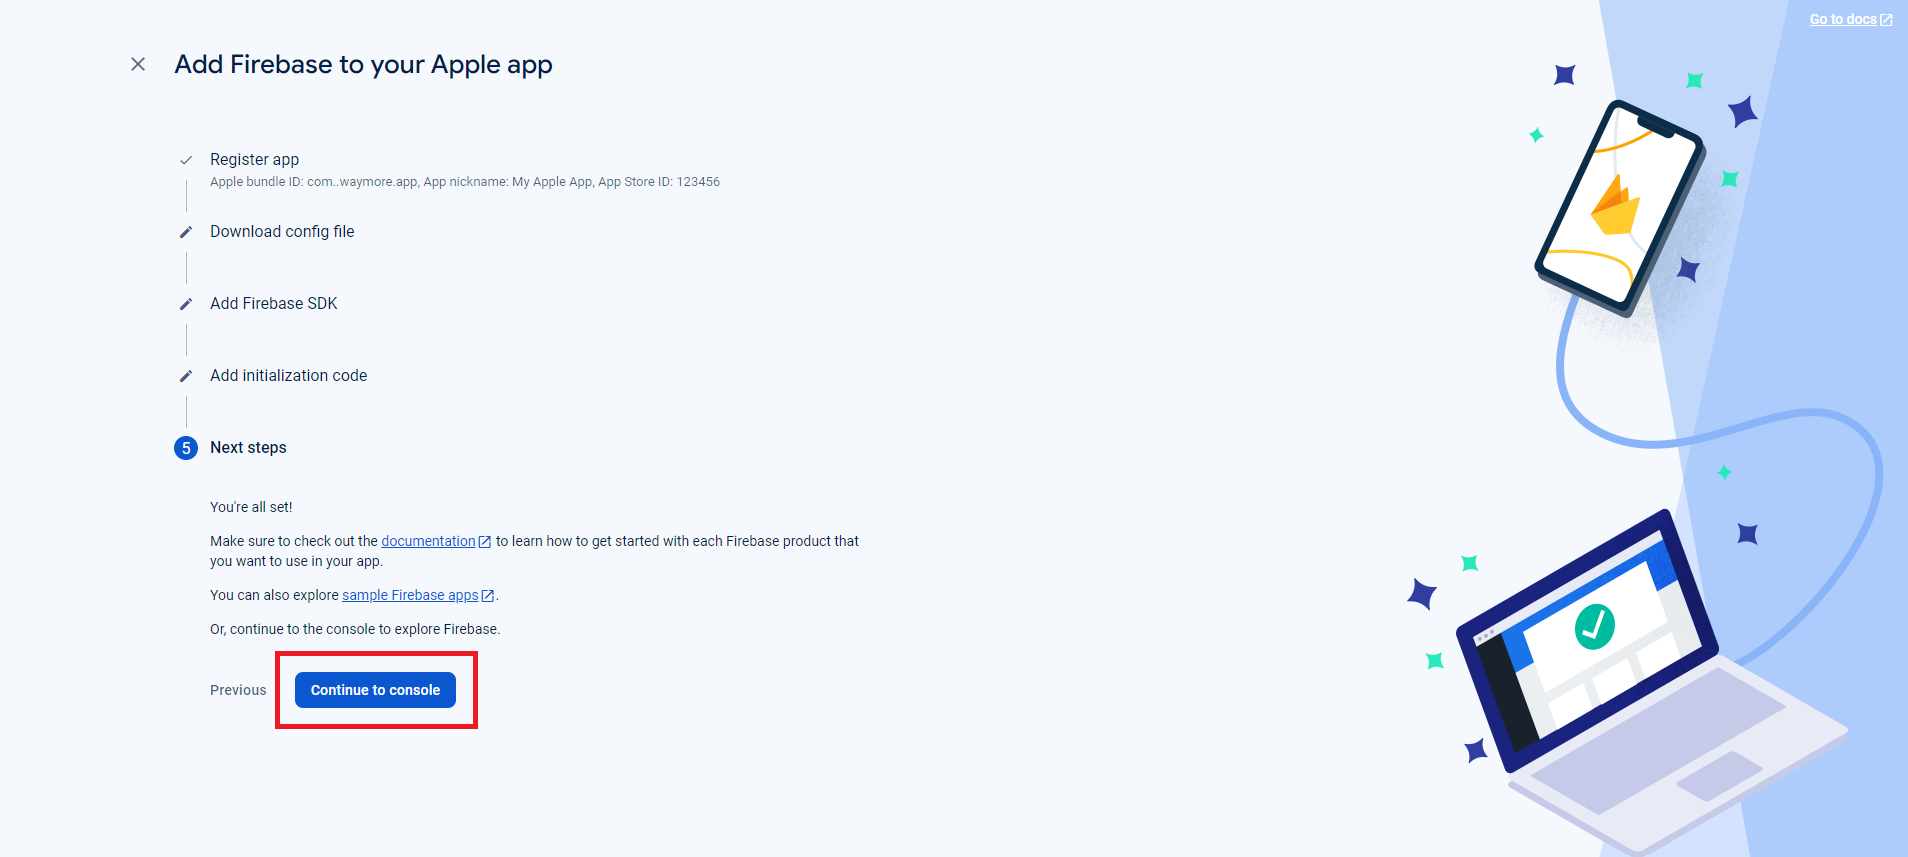
Step 6: Continue to Console
At this step you are all set. For more information check out the documentation and explore sample Firebase apps.
Documentation: Fundamentals | Firebase Documentation
Samples: Firebase Documentation
Step 7: Installed Firebase to IOS App
The app you added will appear in your project.
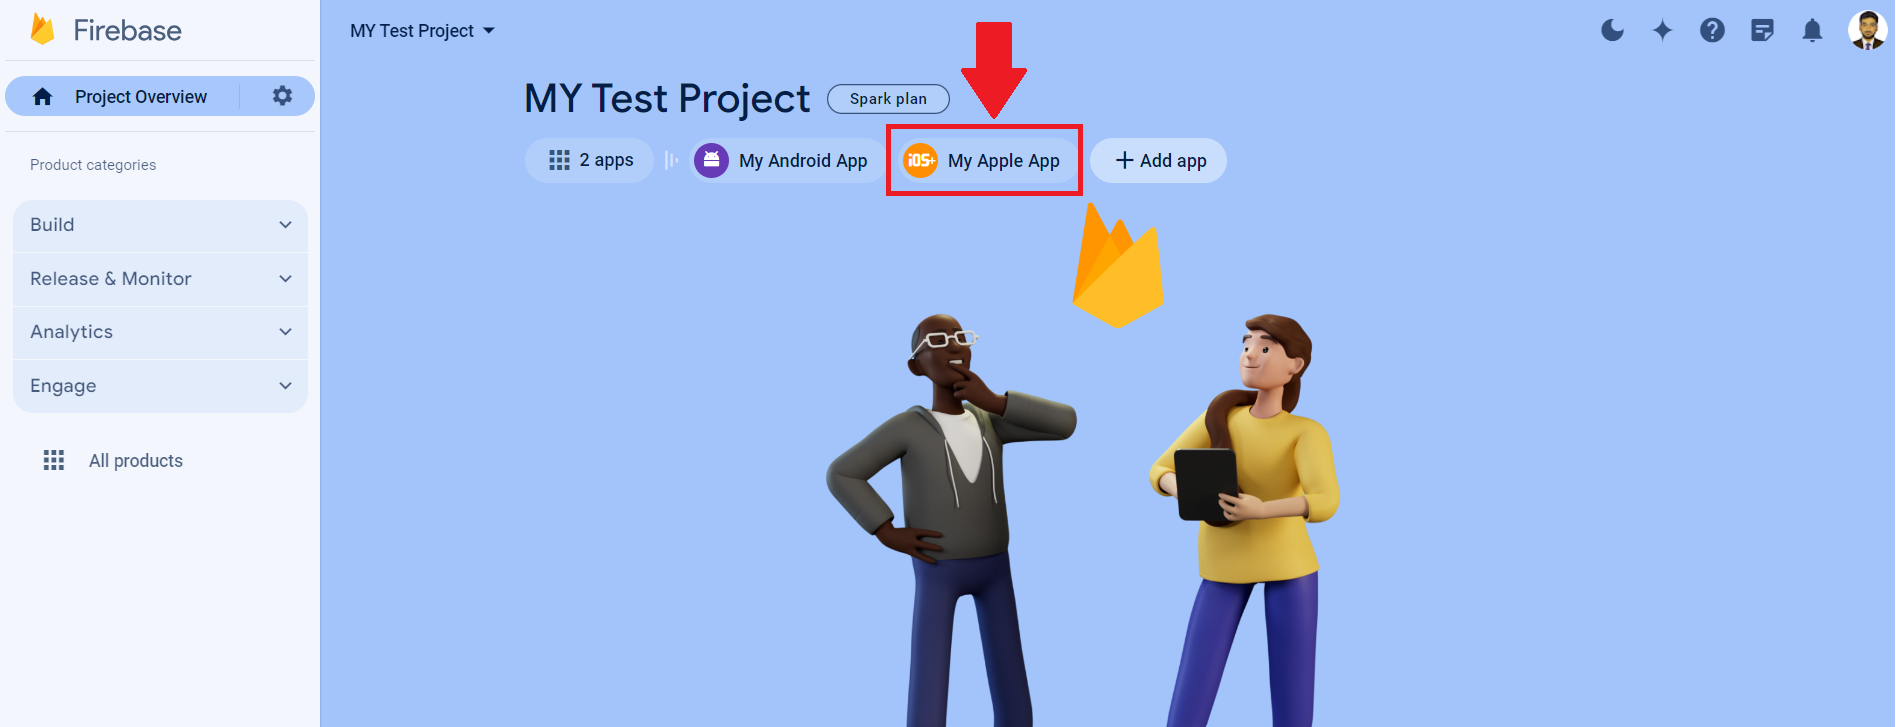
And there is also a provision to add multiple app in to the firebase. just click on the button “+Add App“ to add another ios app.

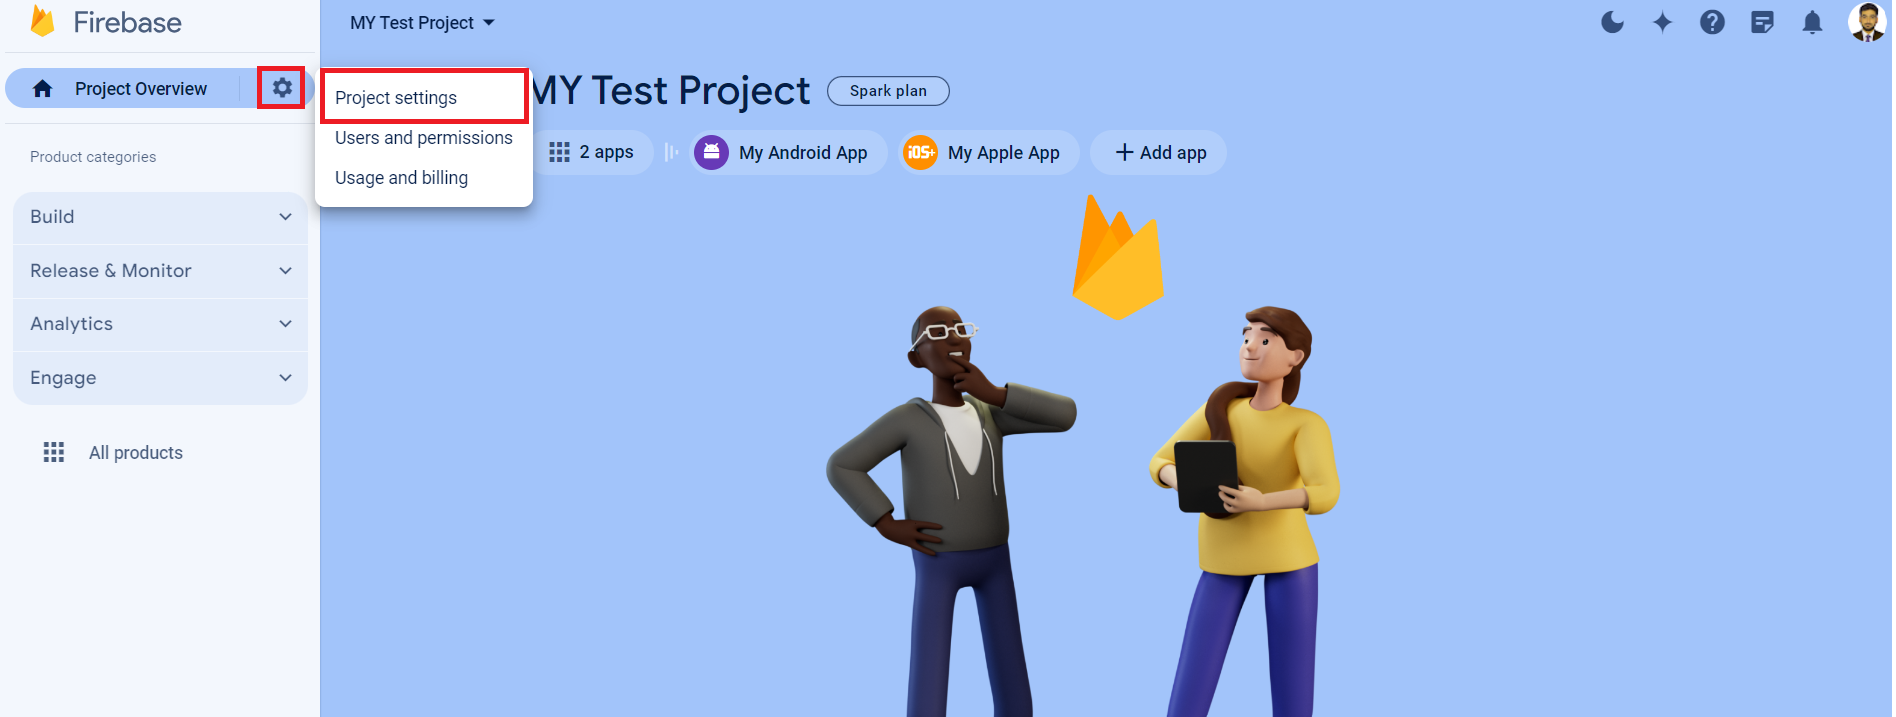
Step 8: IOS Project Settings
You can also check the settings of your project and app by clicking the Settings icon displayed on the ios app button.
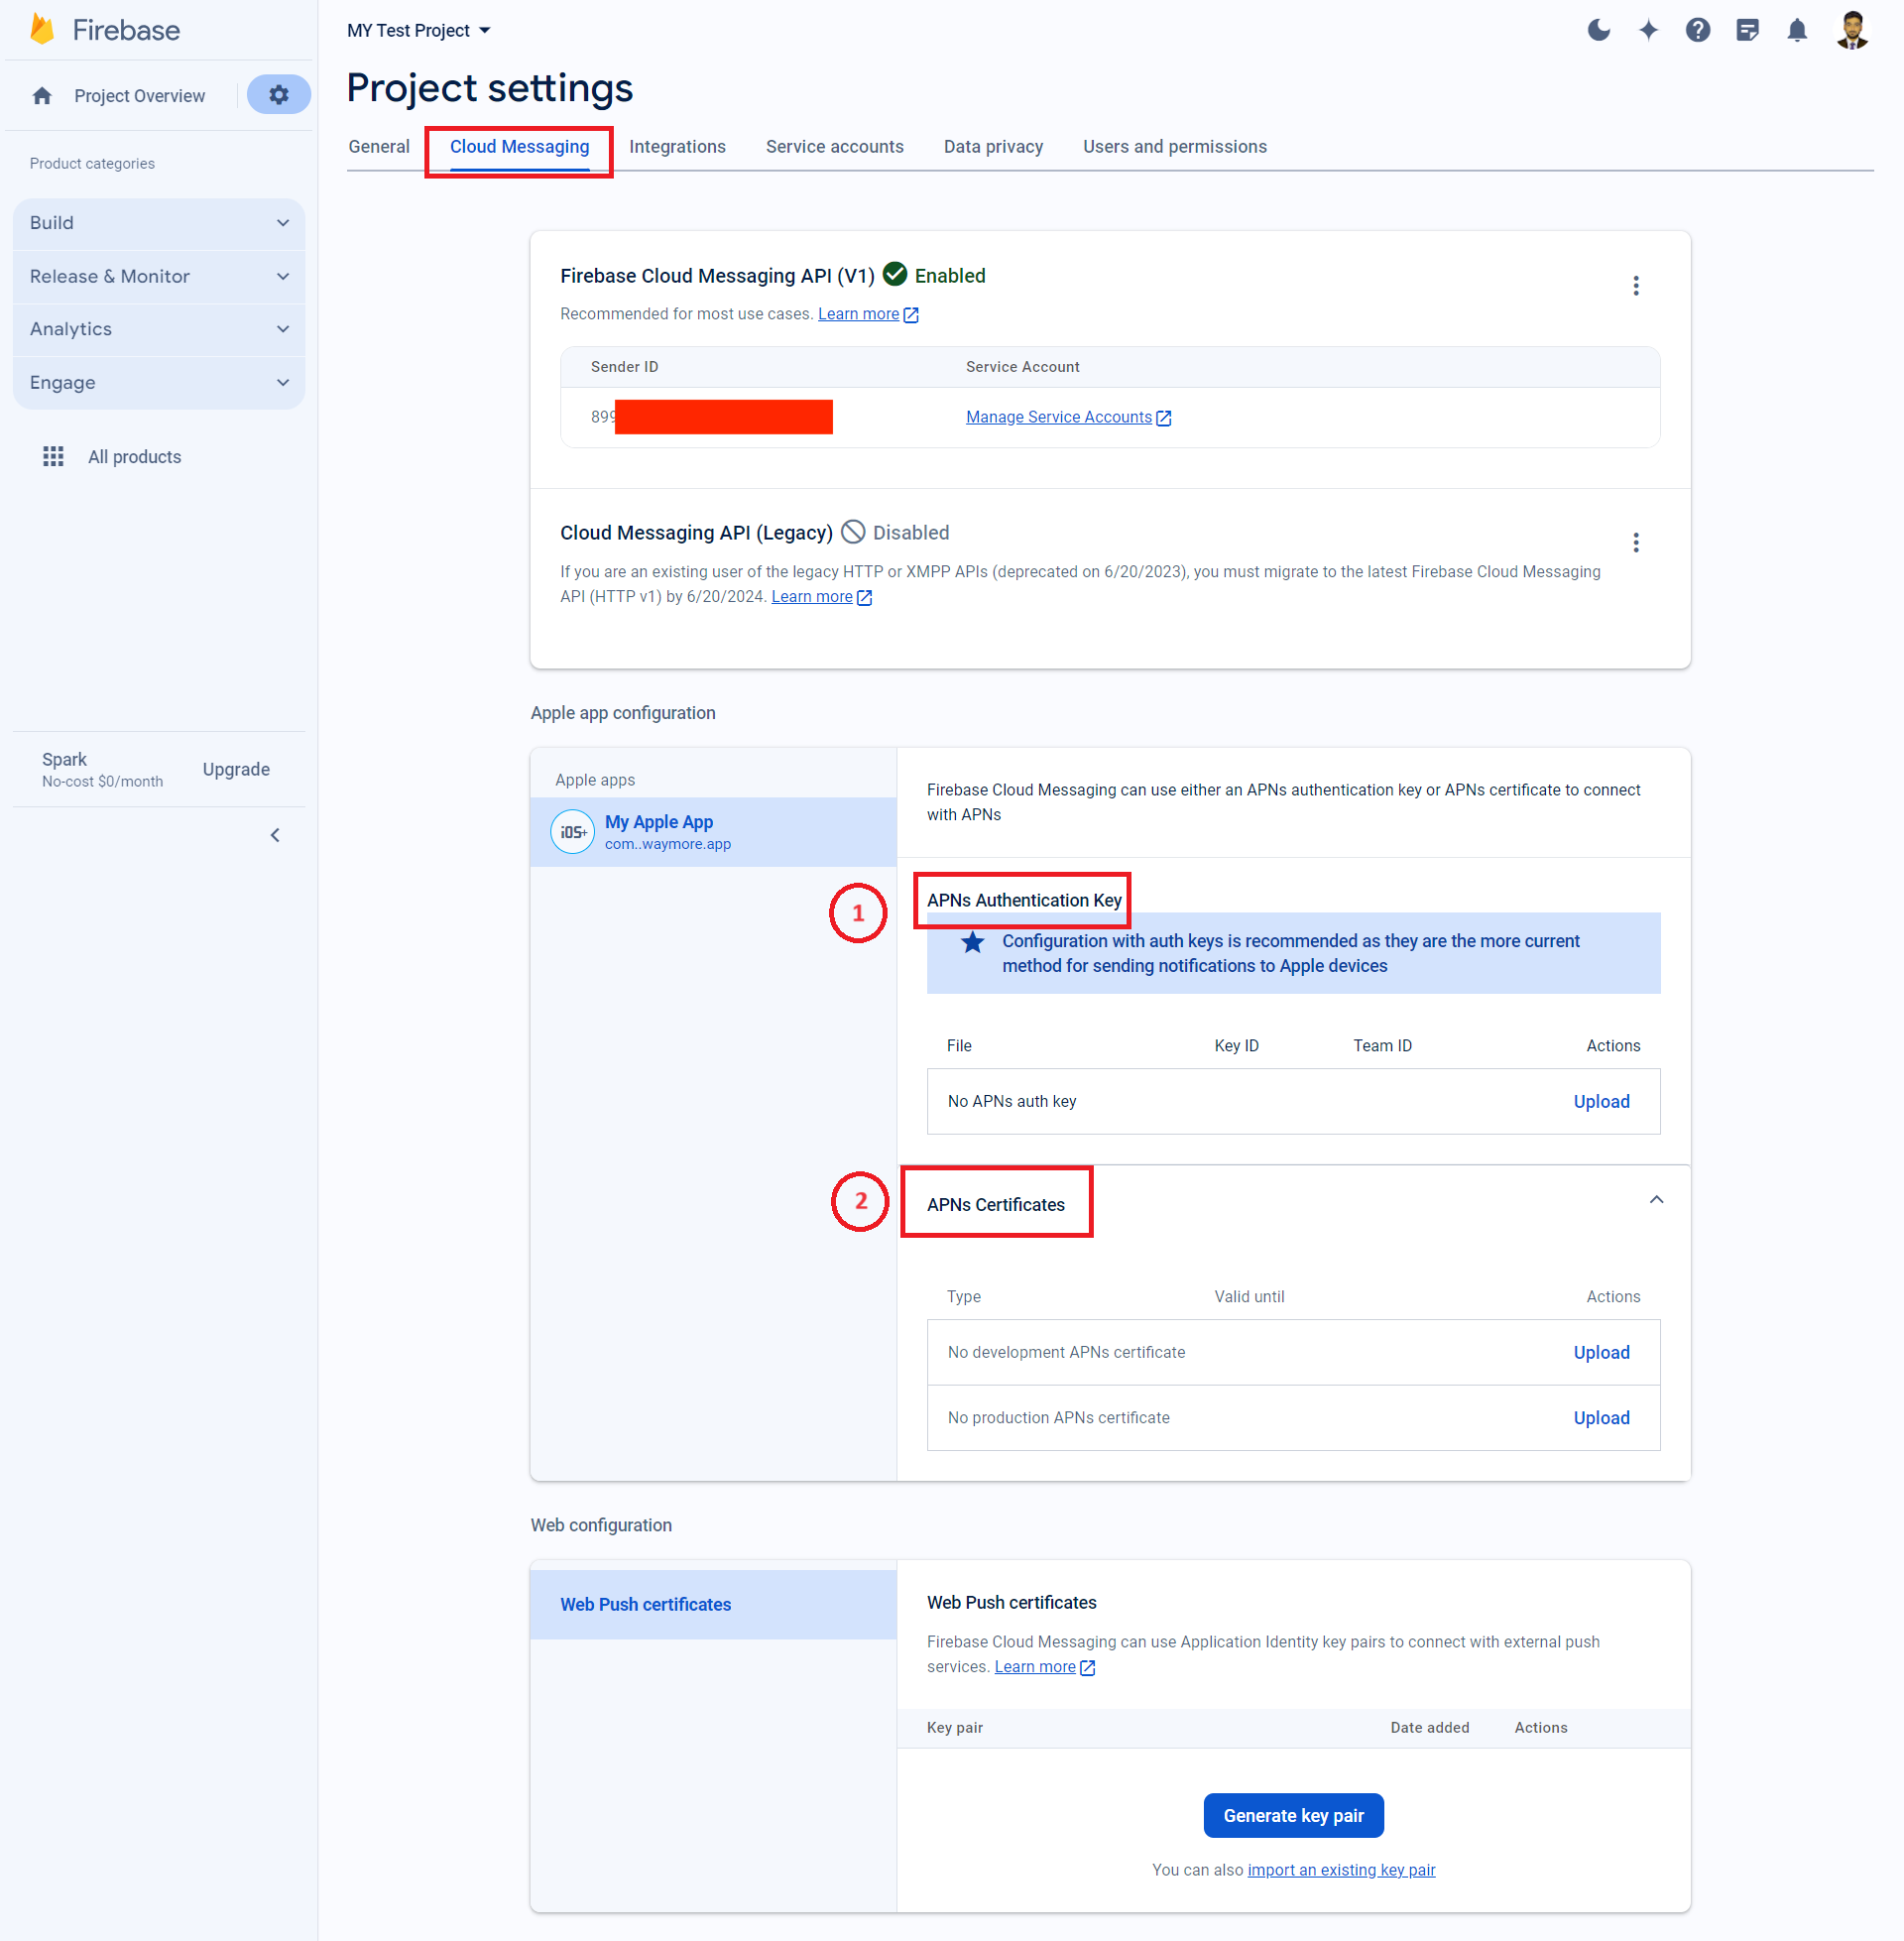
Once you have added Firebase to your application, go to the Project settings and then go to the Cloud Messaging tab.
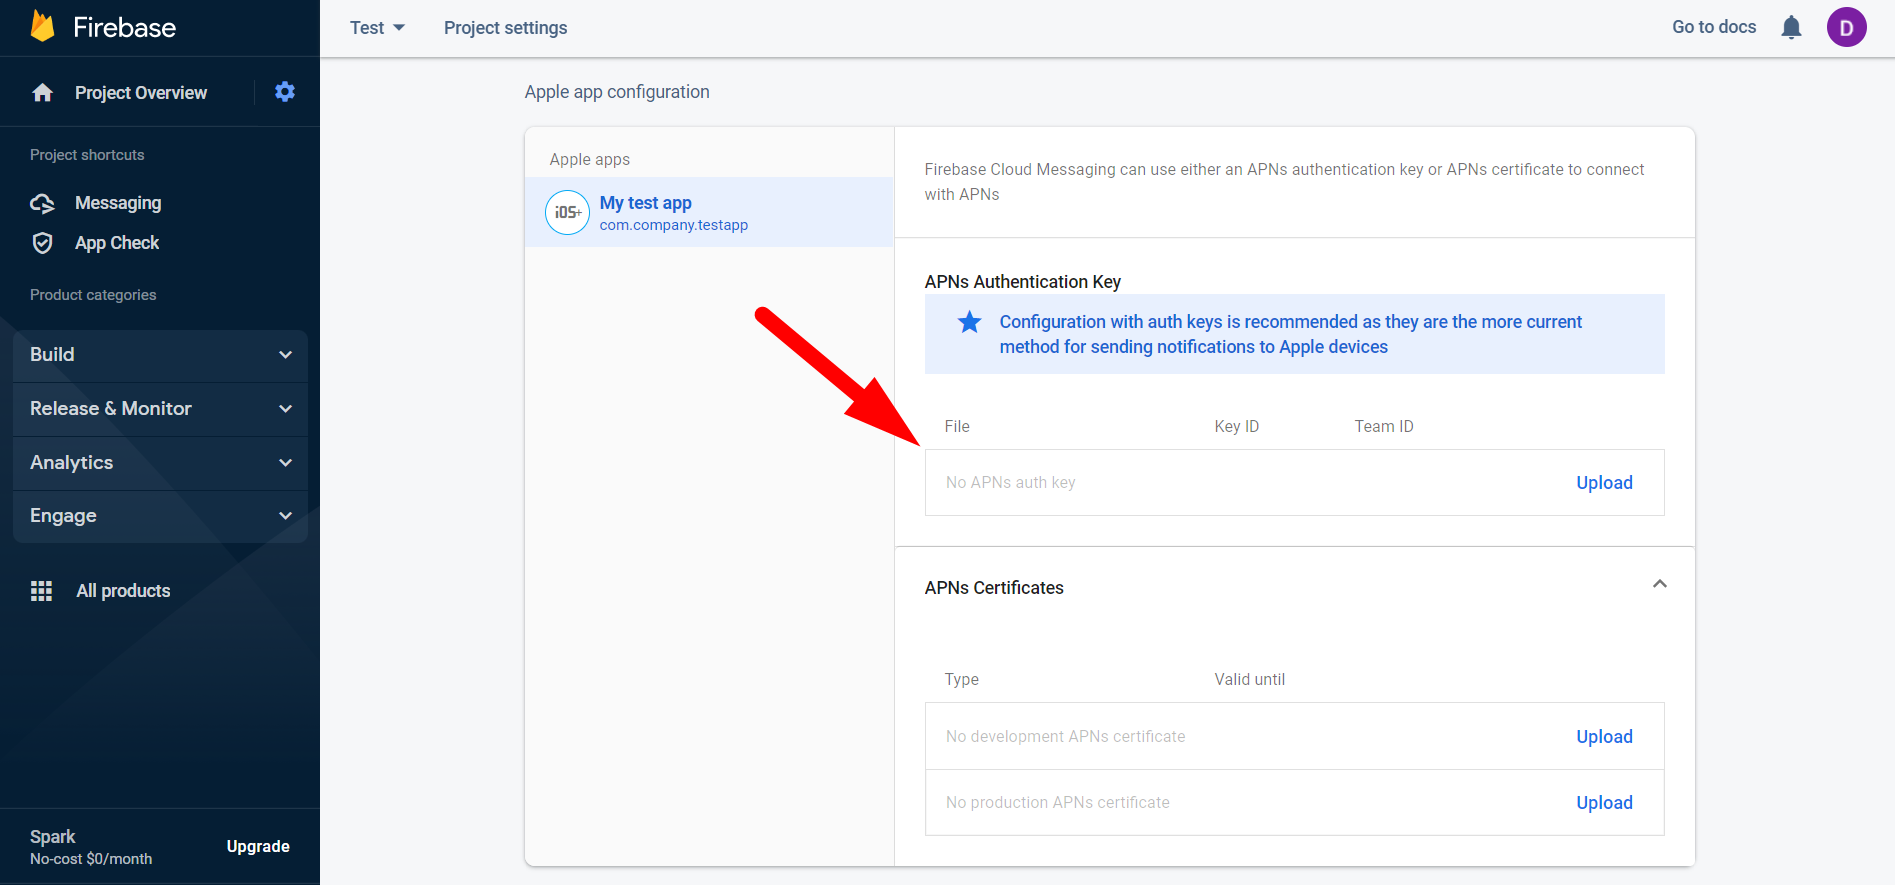
Step 9: Apple App Configuration
For the iOS application you need to upload APNs Authentication Key file or APNs Certificate.
Steps to get APNs Authentication Key to upload it
Here are few steps which need to follow to get APN’s Authentication Key.
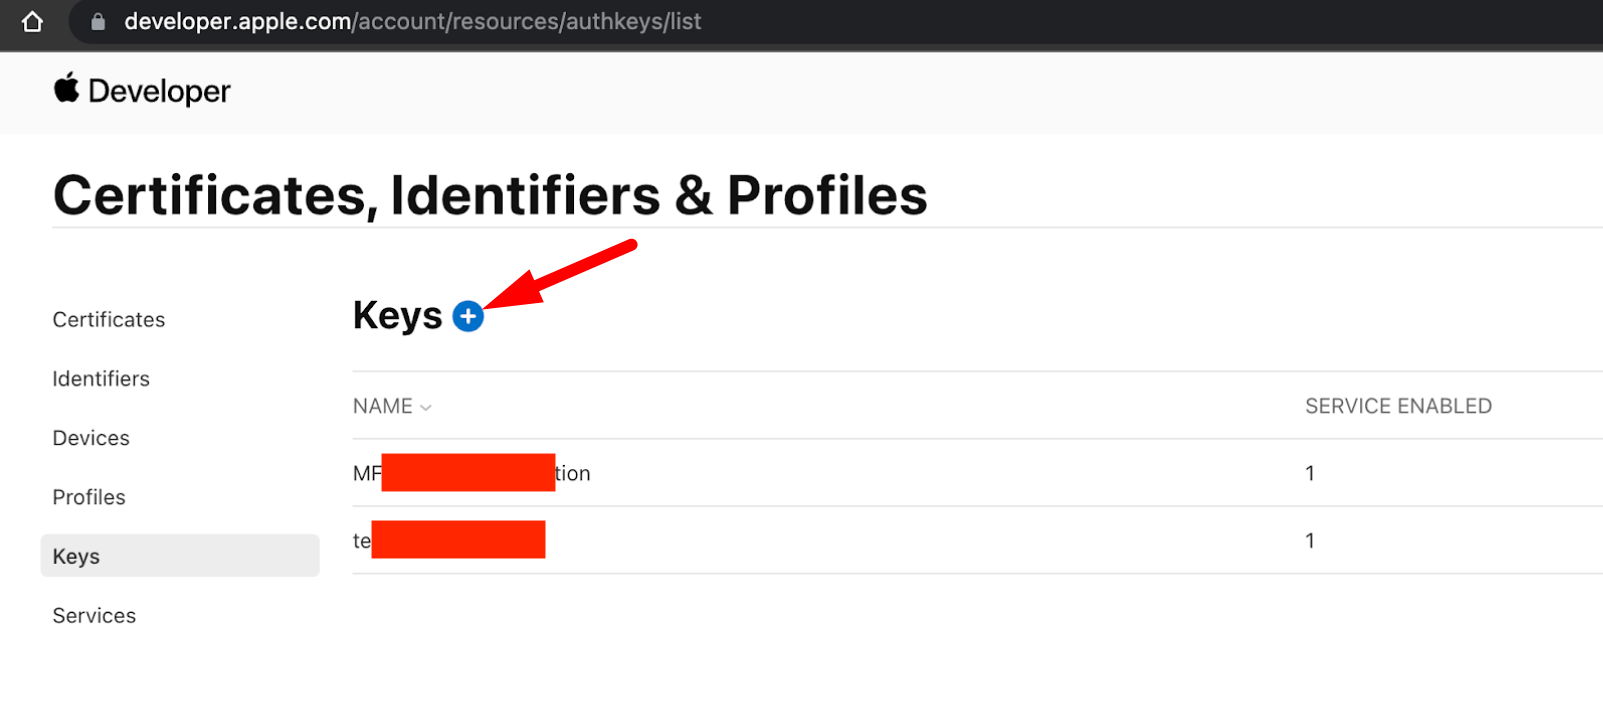
Step 1 : Sign In with Apple ID
1. First you need toSign in with your Apple ID and create a key if you don't already have one. To create a key, select Keys in the sidebar menu and click the Add icon.
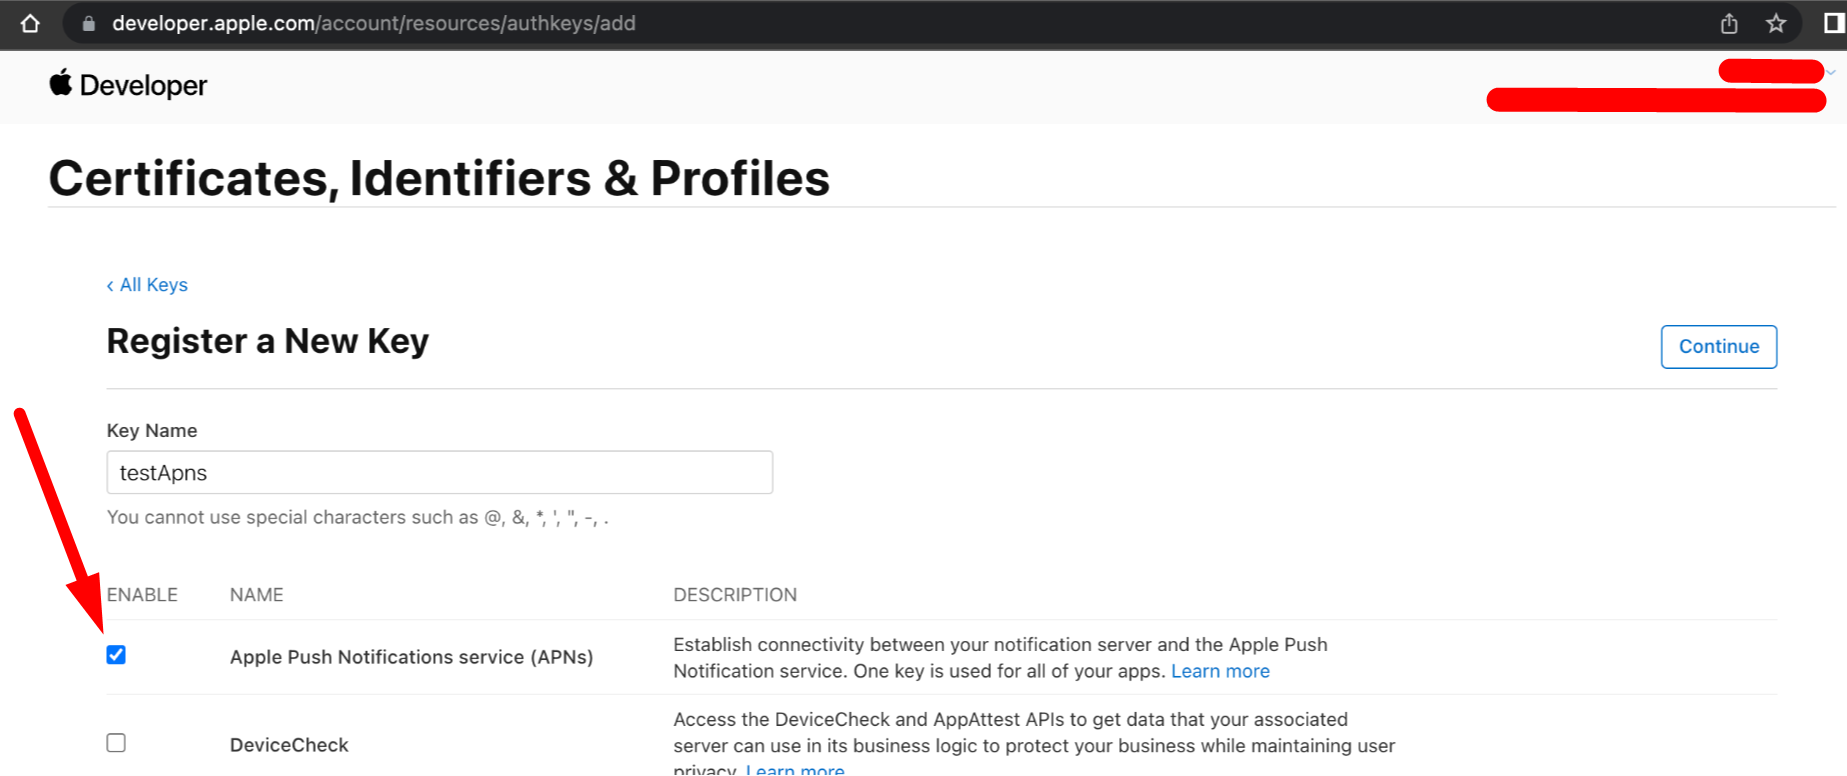
Step 2: Enable Checkbox Name Apple Push Notification Services
Put any key name in the Key Name field and click Apple Push Notifications service (APNs) check box to enable it.
Establish Connectivity between your notification server and the apple push notification service. One key is used for all of your apps
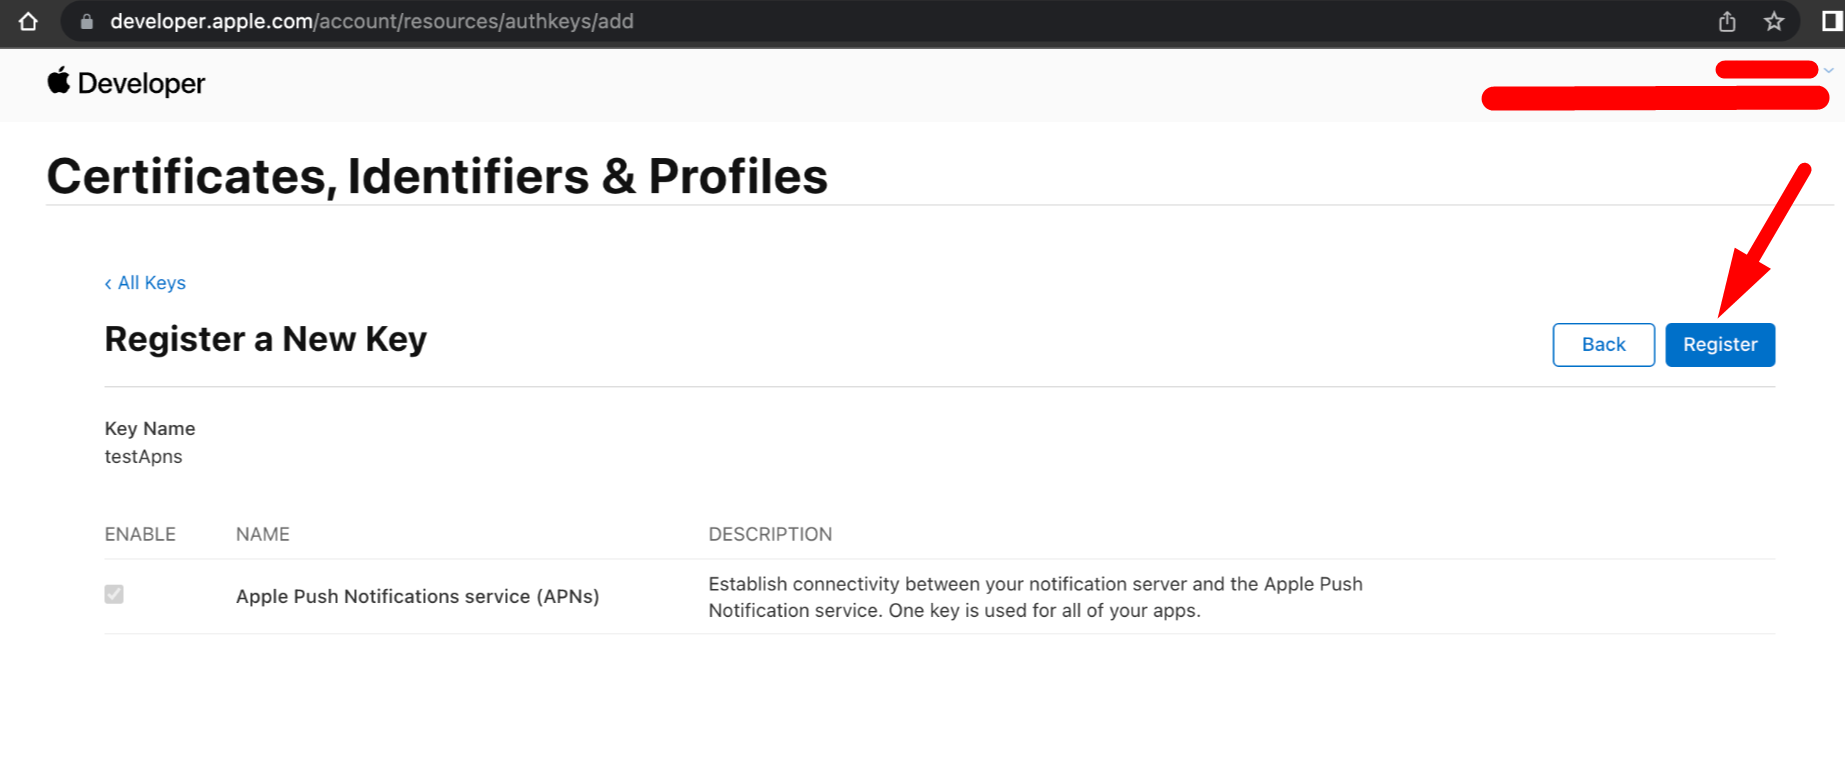
Step 3: Register a new Key
After enabling the checkbox just Click the Register button to register the key.
Step 4: Download your Key
Continue and download the .p8 file.
After downloading our key, it cannot be re-downloaded as the server copy is removed. If you are not prepared to download your key at this time, click Done and download it at the later time. Be sure to save a backup of your key in a secure place

Step 5: Upload the Key in Firebase
Come back to the Firebase console to upload the key (Project settings → Cloud Messaging tab). Enter the Key in the designated field and click on Upload button.
Steps to get APNs Certificate to upload it
Here are few steps which need to follow to get APN’s Certificate.
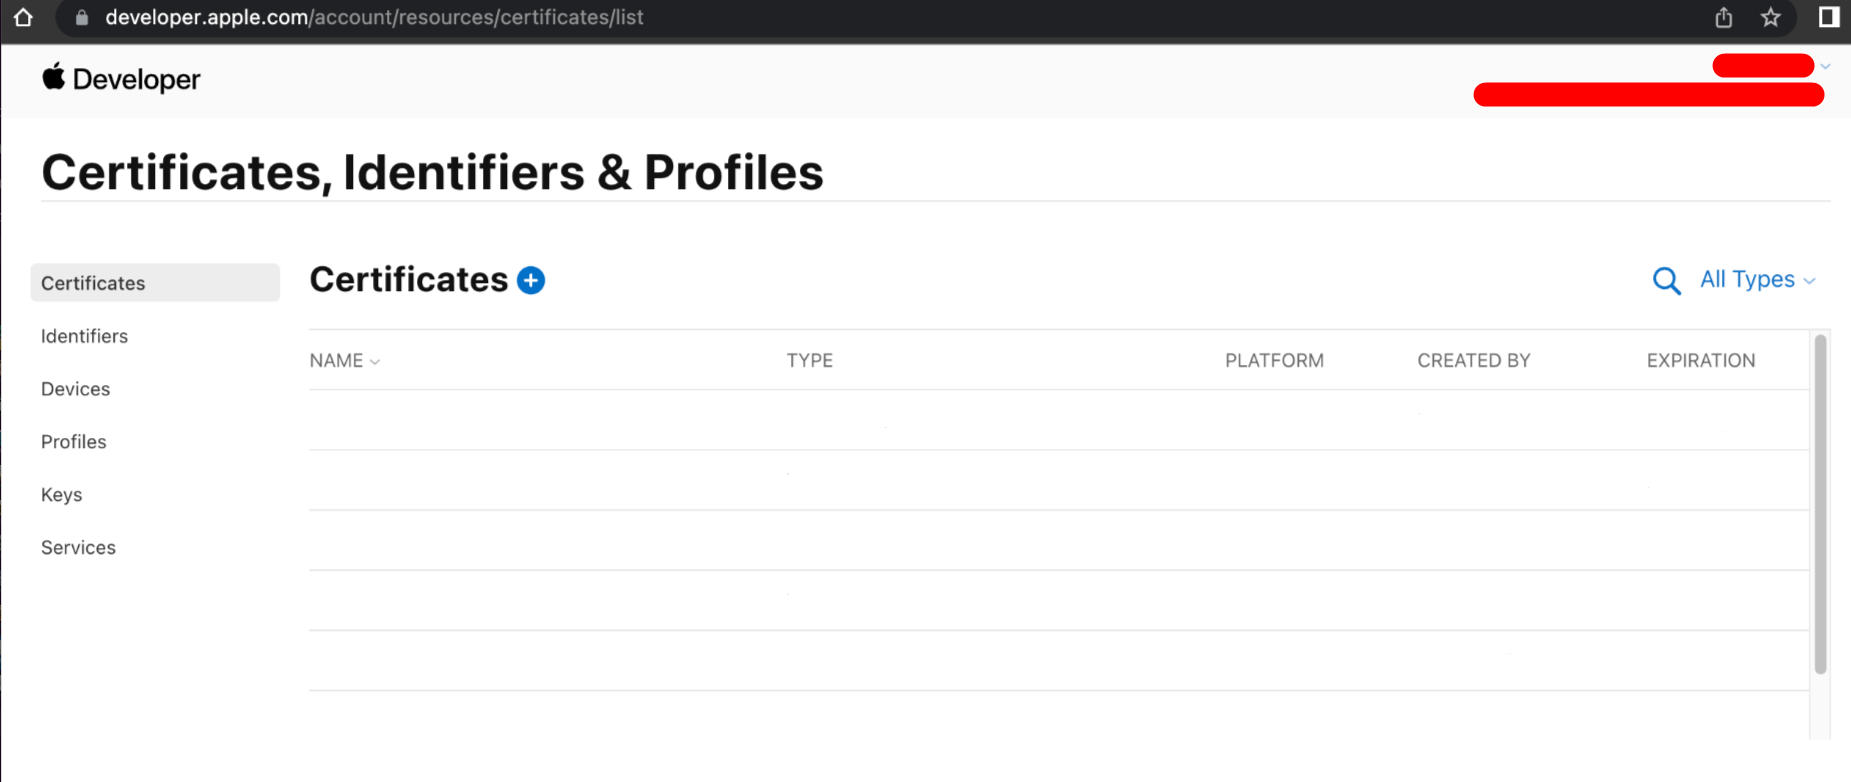
Step 1: Sign in with Apple ID
First you need toSign in with your Apple ID, select Certificates in the sidebar menu and click the Add icon.
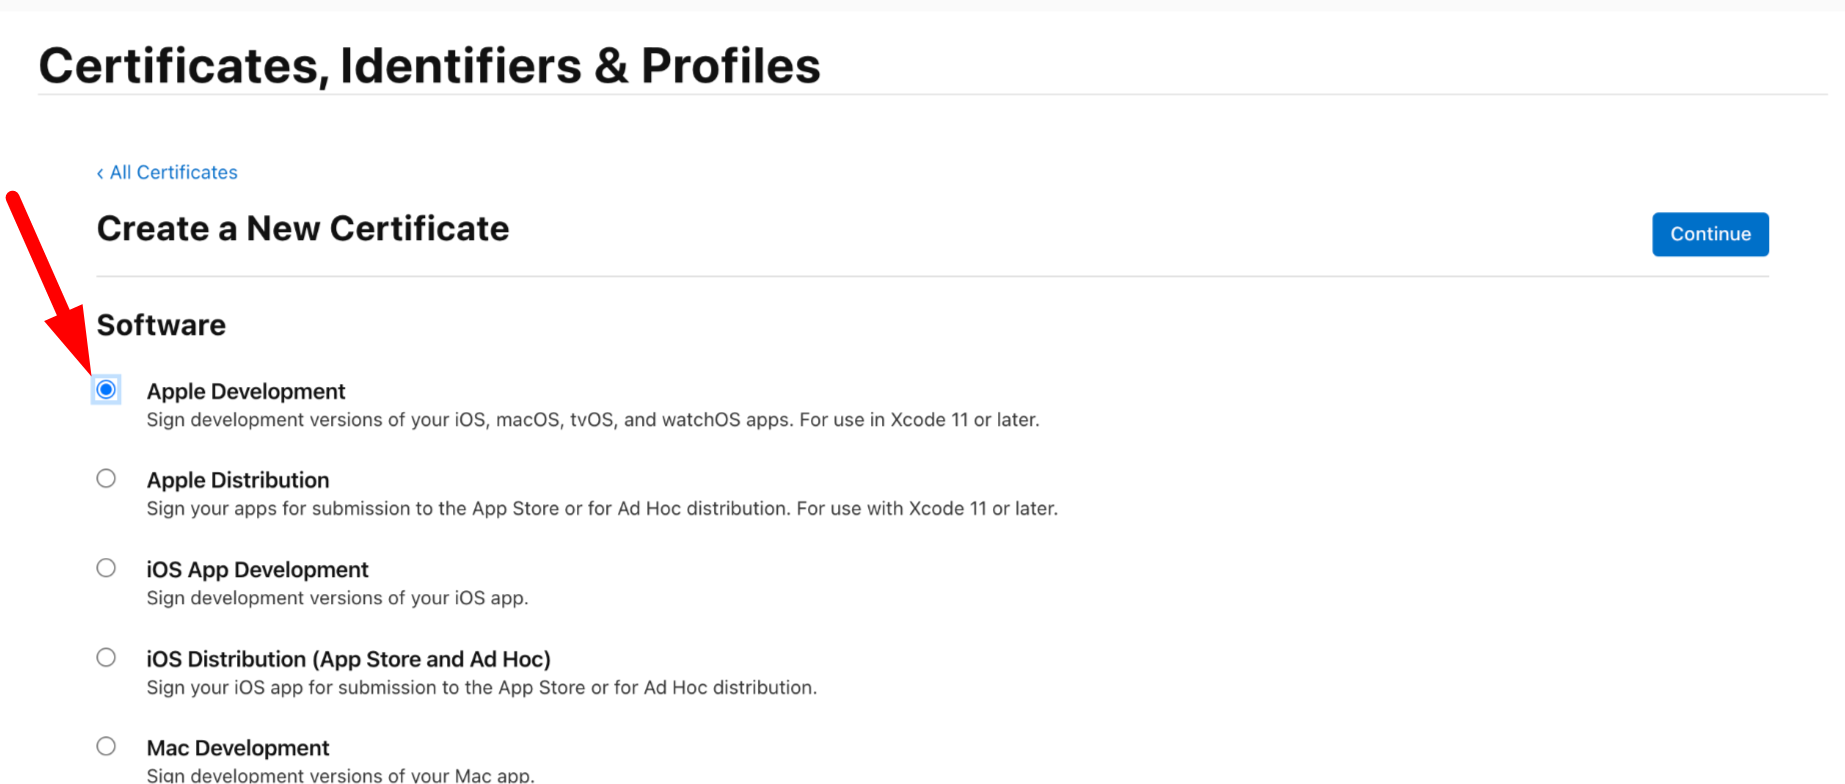
Step 2: Select Apple Development
Note that you can choose Apple Distribution certificate, it will be used for releasing build to live. For all other purpose we will use development certificate. After selecting Apple Development click on Continue button.
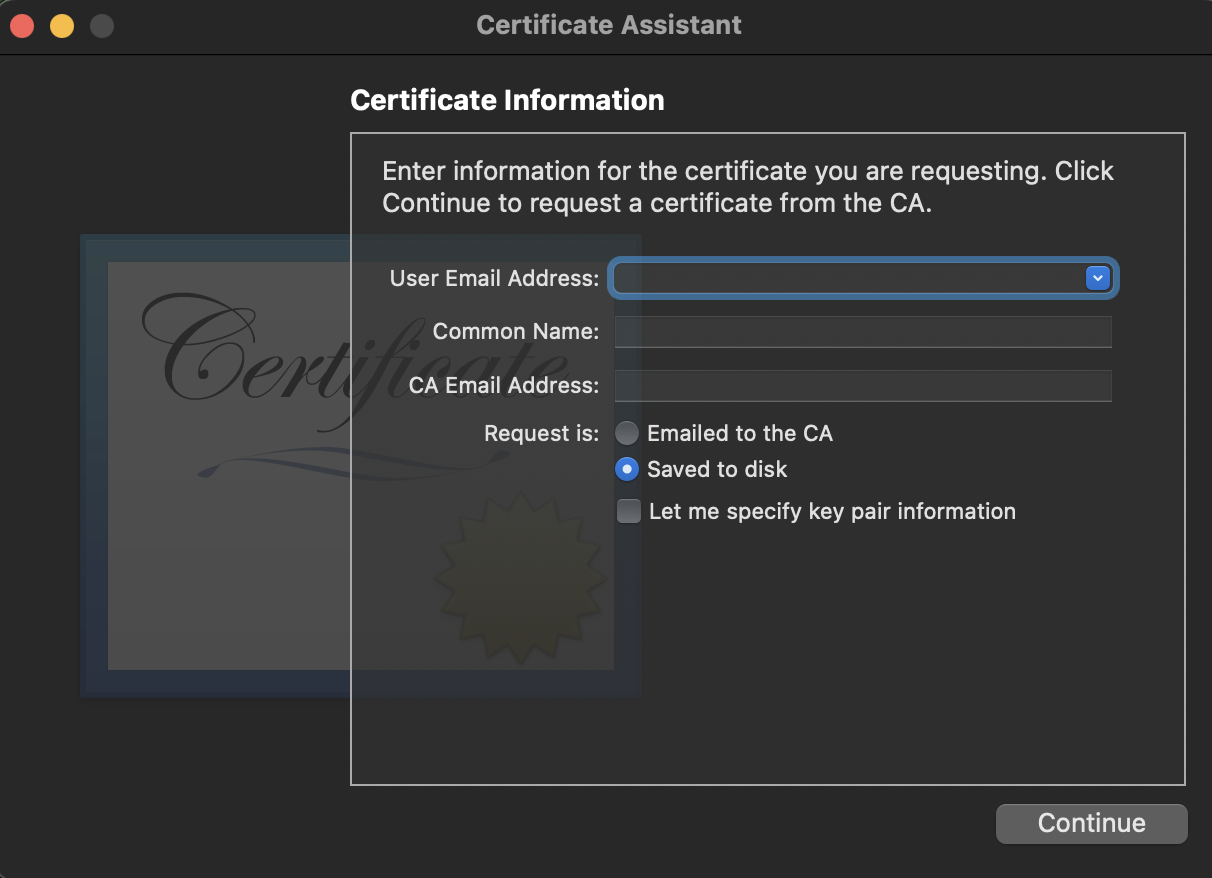
Step 3: Create CSR (Certificate Signing Request)
Here you can create a Certificate Signing Request CSR file from your Mac. The CSR contains information needed to create the iOS Development Certificate.
i. Launch Keychain Access
Click Keychain Access in the main menu → select Certificate Assistant from the dropdown menu → select Request a Certificate From a Certificate Authority.

ii. Certificate Assistant
On the Certificate Assistant dialog, fill the following fields:
- User Email Address: User email address;
- Common Name: User's name;
- CA Email Address: Leave empty;
- Request is: select Saved to Disk.
When you have filled in all the required fields, click the Continue button.
iii. Select a location
Here you need select a location to save and click Save.
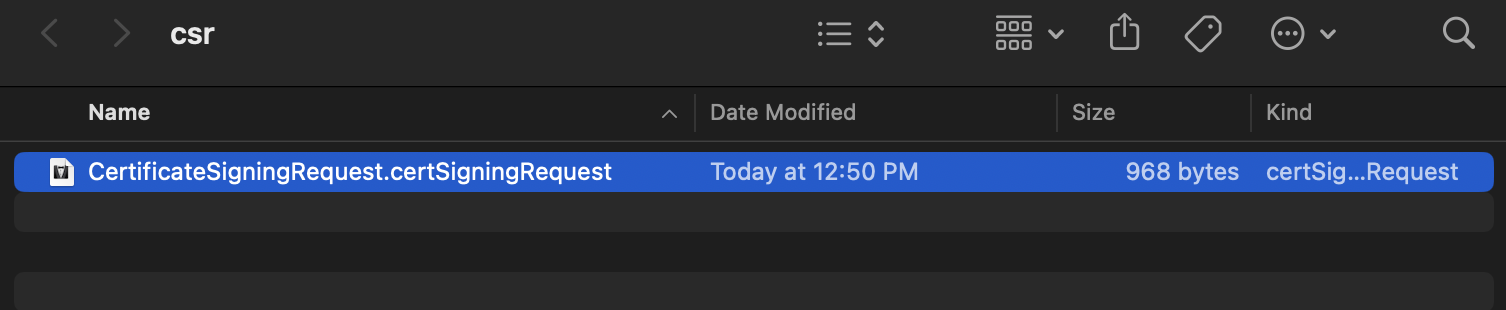
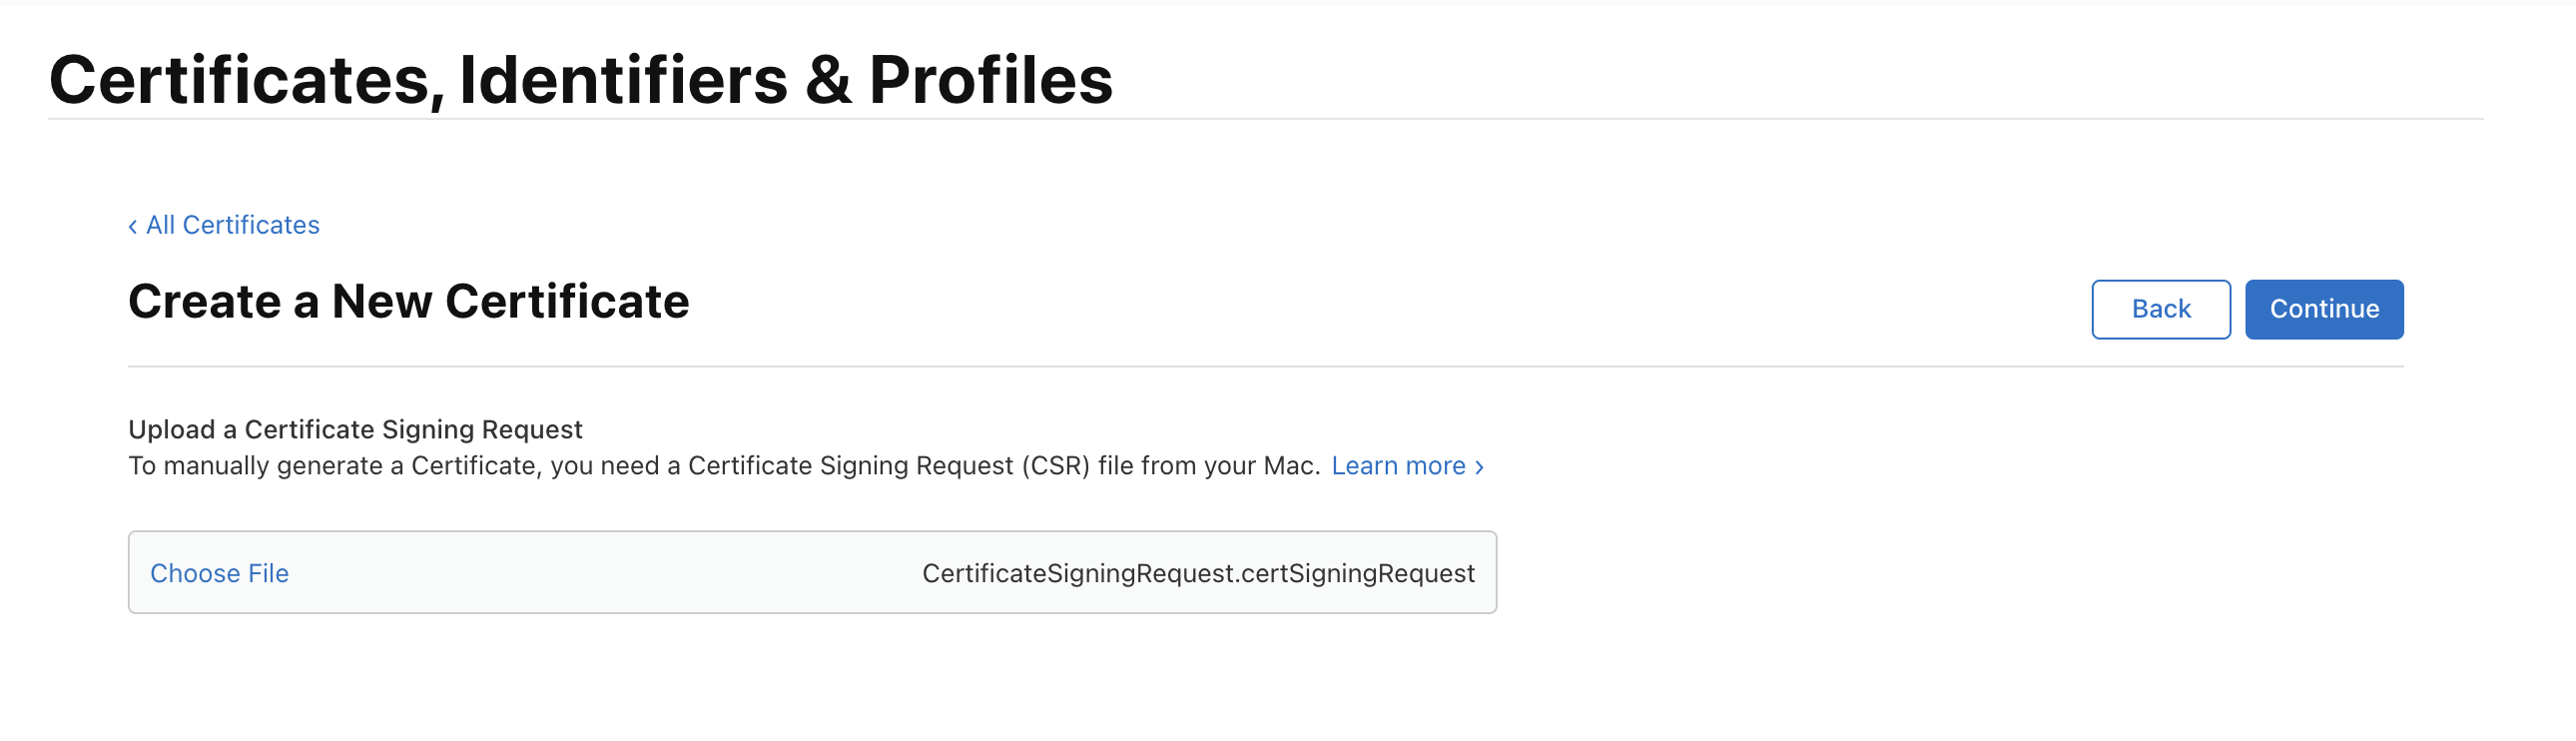
Step 4: Upload a CSR
Upload a Certificate Signing Request by clicking the Choose File button. After attaching click the Continue button.
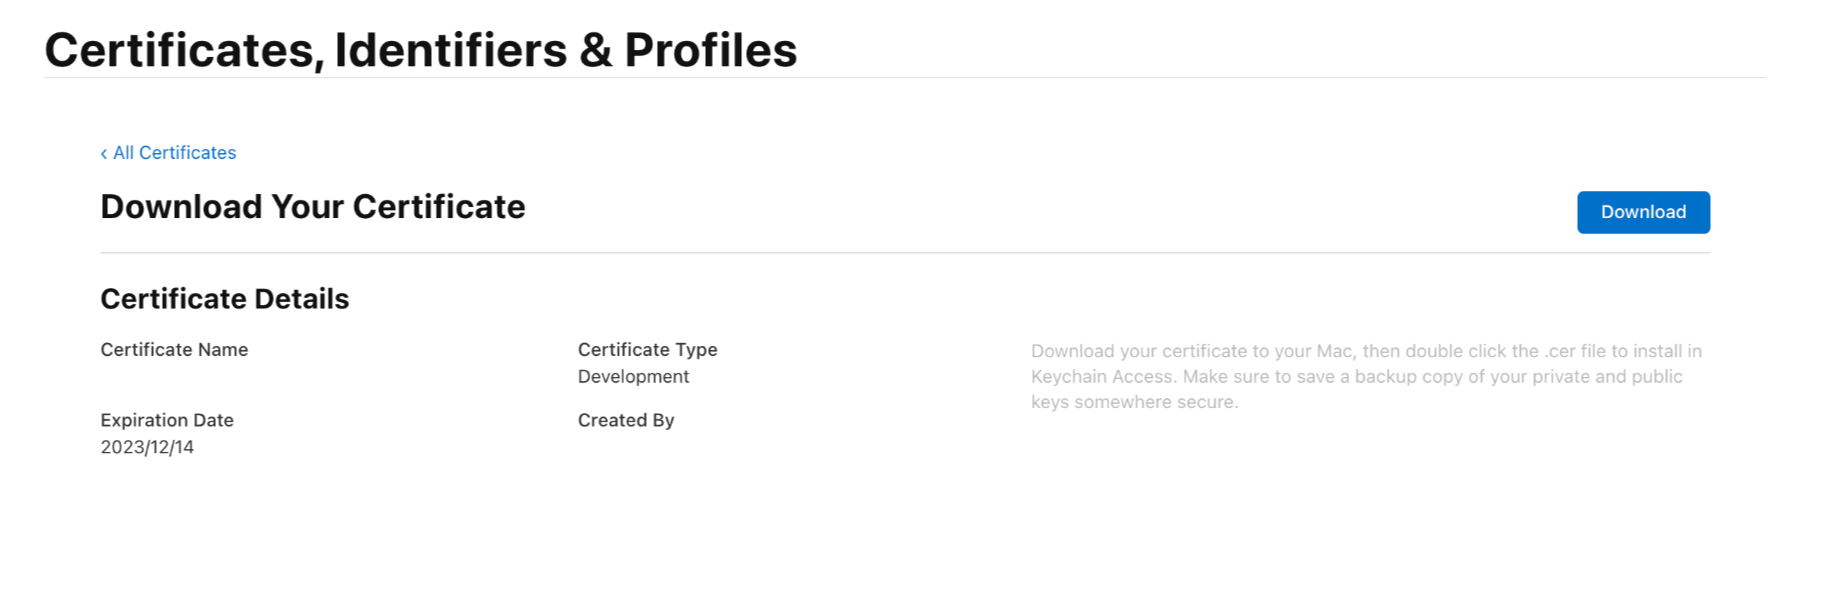
Step 5: Download Certificate
Download your Certificate to Mac, double click it to add to Keychain Access.
Few Details will be Visible against each column
Certificate Name
Certificate Type
Expiration Date
Created By
Step 6: Upload Certificate in Firebase
Now come back to the Firebase console to upload the certificate (Project settings → Cloud Messaging tab). Upload the Certificate in the designated field and click on Upload button.
